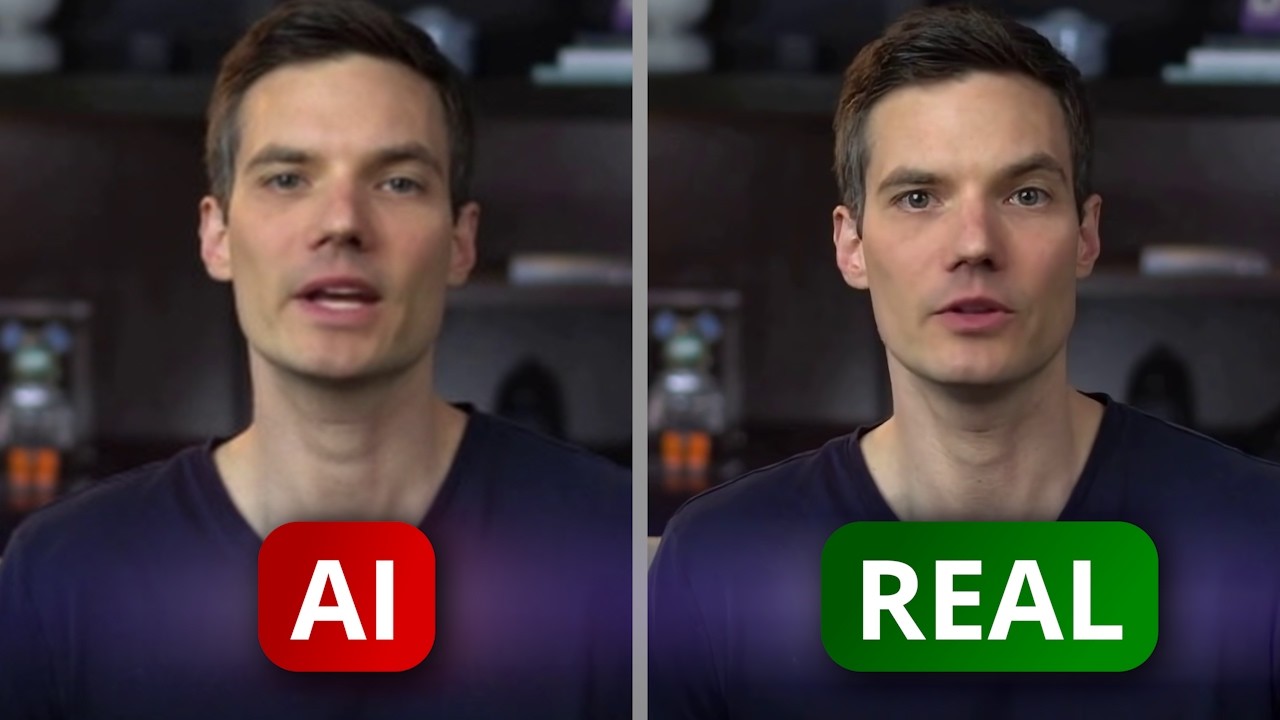
Hi everyone, Kevin here. Today, I’m going to show you how you can turn yourself into a video avatar using DEEPBRAIN AI. What you just saw was an AI avatar of me. It looks like me and it also speaks like me. What did you think? Did you think it was convincing? In this video, we’ll look at how you can make your very own. All you need is a webcam or a smartphone. Once you transform yourself into an avatar, AI can generate a script and turn it into a complete AI avatar video using you as the avatar. This is perfect for training, social media, and even marketing videos. Your first video is completely free and it only takes a few minutes. I partnered with DEEPBRAIN AI to show you how easy it is. Let’s dive in and check this out. Head to the following website. You could click on the card right up above and I’ve also included a link down below in the description. Once you land on this website, click on the button that says, "Create a free AI video," and if you don’t yet have an account, you’ll need to set up a new one. I’ll click on this. This now drops us in the main AI Studios interface. And if we scroll down just a little bit under the quick start category, here you’ll see the option for a custom avatar or what they call an instant personal digital avatar. Let’s click on this option. This now drops us on a page with a brief video that walks you through the best practices for recording a video to turn yourself into an AI avatar. I recommend watching this. Once you finish the video, down at the very bottom, let’s click on the button that says, "Create avatar." On this next screen, you have two different options. You can record yourself with your webcam and here it automatically detected my webcam. Or alternatively, if you go down the page, right here, you’ll see the option to upload a file. here, you can record a video, say with your smartphone, and then you could upload it to DEEPBRAIN. So, you have those different options. I’ll click on upload file, and here too, you have two more options. It can be a stationary video view, or you could also have one that’s in motion. Mine is stationary, so I’ll select this. Here’s my file. I’ll click on that and then down below, I’ll click on open. It’s now loaded my video and right up above, I can see a preview of it. I recorded this in my studio, but again, you could just use your smartphone or even just the webcam on your computer. Right down below, I can enter in some avatar information. Currently it’s called business one, but let me change this to my name, Kevin. It’s male. And over here, you’ll need to go through this checklist and verify all of these different items, I’ll check these boxes. And then at the very bottom, you also need to provide consent. Now this is a video of me and I give consent to turn my video into an AI avatar. Down at the very bottom, let’s click on confirm my video. Once your video finishes loading, you’ll land here in the main editor, and this is what you’ll use to pull together your AI avatar video. Let’s first focus our attention over on the left-hand side where you see all these different faces. These are all of the different AI models that you have available. You’ll see all sorts of different genders, ethnicities, and some of them even support gestures where you can have different hand movements in your video. You have lots and lots of different options. Each avatar will also have its own unique voice that you can use, but you can also swap out the voices. If we look at the very top, here I see a category with all the different custom avatars, and here I see that video of myself that I just uploaded. Down at the very bottom, you can set up different scenes in your video, and over here, I already have my first scene with me selected as the avatar. Over on the right-hand side, you can type in the script that you want your avatar to narrate. If you need help generating a script, down at the very bottom, you can click on this AI script assistant button. This opens up a text prompt where you can prompt the AI to generate the script and you’ll get all of your results here. However, I already have a script in mind. So, in the top right-hand corner, I’ll close out of this. Down below in the text field, I’ll enter in my script that I want the AI avatar to say, welcome to the Kevin Cookie Company, where safety is our top priority. Over here, I can see the project coming together, but I don’t know if this background quite works. I think maybe a classroom setting would be better for a safety training video. To change this background, I’ll click on this image and with this image selected, up on top, that opens up a contextual menu with all these different options. This option here allows me to toggle the background. And when I click on that, that automatically separates me from the background. However, it leaves this generic blue in back of me, and I think I could do better than that. Over on the left-hand side, let’s click into media. Here, you see all different types of media that you can insert into your project. You have different images. Here we have videos and you can even insert audio. Right up on top, you can also filter down to a specific type. I’ll click on image and within image, you could find images on Pixabay or if you want something premium, you could look at Shutterstock. But I think Pixabay will work for this. Right here, let’s type in, let’s say maybe an office setting. I think that’ll work well. And here we get all different types of results back. I like this one. This almost looks like a classroom type setting in an office. I’ll click on that and that inserts the image on top of me. Of course, I don’t want this image to be on top of me, so I need to adjust the layer. With the new image selected, up on top, I get all those different contextual actions. And over here, I could click on this to adjust the position. Say, for example, I want to send it to the bottom or under me. But also over here, there’s the option to set this image as the background. I’ll click on that and apply it only to this slide. And there it’s taken that image and it’s placed it behind me. It’s looking nice. To make this feel really corporate and official, I also need to throw in a logo. Over on the left-hand side, along with using existing media, you can also upload your own assets. And when I click on this, you can upload images, videos or audio files directly from your computer. And you even have the option to record your screen. Let’s say, for example, that you’re pulling together an instructional video. You can do all of that directly in your browser. Down below, I see all of my different uploaded assets and I’ve already uploaded a logo for the Kevin Cookie Company. So, I’ll click on this and this now inserts it directly into my project. And with this image selected, I get these handles on the edge and I could adjust the size. Let’s make this a little bit smaller, and here I’ll place it up in the top left-hand corner. This is coming together. Now that I finished my intro scene, let’s add another scene. Down at the very bottom, let’s click on this plus icon and this now adds another scene and you’ll see that there’s no script entered yet. Now, I don’t think this is going to be very engaging if it’s just me talking the entire time to employees, so let’s see if we could insert another avatar. Over on the left-hand side, let’s click on models and here we see all the different model options. And here I really like Philip in red. Let’s click on this option and this will now swap out the avatar for the new avatar. And with this avatar selected, over here, I could adjust these handles to adjust the size. So let me make them a little bit larger and then we’ll place them right near the center of this scene. Over on the right-hand side, I’ll type in the script that I want Philip to say. Now, right in the top right-hand corner, here I can see the voice that it’ll use. Currently, it’s set to English using the original voice of Philip. When I click on this, this opens up all these different options. Let’s listen to Philip’s original voice. Hello, my name is Philip and I am an avatar developed by DEEPBRAIN AI. Let’s make a video together. Now that sounds pretty good, but I could also go through here and I could choose all these different voices. In fact, I could even have Philip use my voice. Let’s have a quick listen. Hello, I am a virtual human created using DEEPBRAIN TTS technology and avatar tech. Wow, that sounds remarkably like me. If we look down this list, you have all of these different voices. You could choose from so many different options. And one of the really neat things is you can even have voices in other languages for this person. So, this makes your video accessible around the world. Again, many different options. I like the voice that Philip currently has, so I’ll stick with the default and up on top, let’s click on the X. Down at the very bottom, you can also adjust how Philip reads all of the different texts that you entered in. For example, maybe we want Philip to read just a little bit faster. Over here, I could click on this and let’s adjust the scene speed to 1.1. You could go all the way up to 2X or if you really want people to understand the content, you could also slow it down all the way to 0.5, but that’ll be a little too slow for this. You can also add different gestures. For example, here, let’s go to the very beginning of this talk track and let’s add a gesture. This inserts a greeting, and if I click on this, I can adjust the gesture. And I think it’d be nice for him to wave at the very beginning, so let’s use this greeting gesture, but I do also have different options or you can even clear it. Let’s go with the greeting. Here he says first, always ensure that the ventilation vents are open during baking. So, I really want that point to sink in, and I think it might be nice to add a pause after he says that. So, with my cursor right here, down at the very bottom, you also have the option to add a pause. Click on that and it adds about a 0.5 second pause. That way, that point really lands. Along with that, there are also some other options. For example, there is a dictionary. Let’s say that maybe Philip is not saying a word the way you want him to say it. You could click on the word, go down to the dictionary, and then here you can adjust how he says it. However, I don’t think he has any trouble with these words, so I don’t need to make any changes. And you can also tag people to bring their attention to certain areas of this talk track. But I think all this now looks good. Down at the very bottom, we can preview how he says it. Let’s listen. First, always ensure that the ventilation vents are open during baking, so the delicious aroma of our cookies wafts through the neighborhood, enticing more customers. I felt like that pause was just a little bit long. So up on top, I’ll click right over where this pause is and let’s remove that. Again, I have full control over how he’s speaking and reading this script. Along with having just Philip speak, over here, if we click on this tab, you can also bring other avatars in and you can have a conversation with those avatars. Or maybe you’re not feeling an avatar. Right up on top, you can click on this microphone icon and here you can upload your own audio or you could even record your own audio. So, you have different options. But let’s click back into this view and I’m satisfied with the way this turned out. However, I do think we need to change this background. Right now, he’s also in that training room. But I’d like to see him on the factory floor. Over on the left-hand side, let’s click on generate to see if maybe I can assist us with this. This opens up the image and also video AI generator. I want to generate a background image. And here I can type in the description of the image that I would like. I simply want a cookie factory, so I’ll type that in. You also have some example prompts that you can use and you can choose different styles. I want this to be photo realistic. Here, I’ll set it to landscape and then let’s click on generate. And look at that masterpiece. We are baking lots of cookies. Up on top, I’ll click on this image and this now inserts it onto the scene. And I want this to be the background. So, like we did earlier, let’s go to the very top with that image selected and then click on set as background, and I want it to only apply to this slide. I’ll click on that and look at that. Phillip is hard at work. I’m now ready to add yet another scene. Down at the very bottom, I’ll click on the plus icon and that creates a duplicate of this slide. Over on the left-hand side, let’s click back into model and this time let’s go with Mia also in red. I’ll click on her and that swaps out Phillip for Mia. And here again, I can adjust the size. I could also adjust the position and over on the right-hand side, I can type in the script. Here I’ll have Mia say this. On the slide, I want to reinforce what Mia is saying with some text. Over on the left-hand side, let’s start by adding a shape. And here we have all these different shape options. I’ll select the rectangle and here I could position it where I want it in this scene. I’ll expand it just a little bit so it sits right at about there. With this rectangle selected, here I have all these different contextual actions. Let’s add a drop shadow, I’ll click on this and then toggle this on. Here, I could click out. Now over on the left-hand side, let’s insert some text. I have different text size options. I’ll go with body text and this now inserts some text into the scene. With the text selected, here too, I have different options that I can use to configure the way this text looks. Let’s double click into the text and here I’ll enter in sample frequently. We want to make sure that people are eating our cookies so we don’t send out any bad product. Here I’ll position it in the middle and we could even expand the size a little bit just to make sure it really stands out. And here I think that’ll do a good job reinforcing what Mia is saying. Let’s change up the background for this one as well. And again, let’s use AI. Over on the left-hand side, let’s click on generate and I want lots of chocolate chip cookies in a factory. Let’s make this. That looks beautiful! Up on top, I’ll insert this and let’s set that as the background only for this slide. Perfect. Let’s insert one more scene. Down below, I’ll click on the plus icon and over on the left-hand side, let’s click on model. And for this one, let’s go with Hayden. Up in the scene, I’ll delete the rectangle and also the text and let’s move her over to the left-hand side. Right over here, I’ll enter in the text that I would like her to say. Then let’s generate one more background by clicking on generate, and here I’ll type in some text. Down below, let’s click on generate. Right up on top, let’s insert this image. I’ll click on it and then we’ll set that as the background. Great. As you start pulling together your project, you’ll likely end up with many different scenes. If you hover over any one of the scenes on the triple dots, here you’ll have different options. You can add transitions. You can also adjust the position of the scene. Move right, move left. You could duplicate a scene and you could also remove a scene altogether. I think this video is now just about ready. However, I want to make sure that all of our staff members are able to follow along with what’s being said, and I find that captions really help with that. Over on the left-hand side, let’s click on captions, and here you can upload a caption file if you have an SRT file, or you could also just have AI generate captions. Let’s try this. And look at that. We now have captions overlaid on this scene. Now, of course, I could go through and add captions to the entire project. I think this video has really come together nicely and I’m ready to finalize it. Up in the top right-hand corner, let’s give this project a name. I’ll call it the KCC safety training video. Now over here, we can preview how it turned out. With a preview, it’ll generate a talk track for all the different scenes and it’ll show you the different scenes; however, the AI avatar will not be animated. Generating the AI avatar is computationally intensive. So, it’ll only do that step when you’re finally ready to export. And I think I’m ready to export. So up on top, let’s click on this. This opens up all of the different export settings. Here I can see that my project’s around 50 seconds and that’s what I’ll be charged for. Down below, I can also translate this video into different languages and it’ll use your voice. So, if let’s say I export into Korean, it’ll be me or Kevin in Korean. That is so impressive. Maybe when we open factories in different countries, it’ll make sense to choose some of these different languages. Down below, you could also select what you would like to export and you also have some additional options. Down at the very bottom, let’s click on export. And look at that, the video is now on the way. Perfect. Over on the left-hand side, let’s click into videos and then right here, let’s click into the safety training video to see how it turned out. Welcome to the Kevin Cookie Company, where safety is our top priority right ahead of making the most delicious cookies in the world. Here are some important points to keep in mind to ensure a safe and successful experience at our company. First, always ensure that the ventilation vents are open during baking, so the delicious aroma of our cookies wafts through the neighborhood, enticing more customers. Next, regularly sample our products to maintain our high-quality standards. Your taste buds will thank you. And finally, if you’re not a strong swimmer, please avoid the chocolate river to ensure your safety. Thank you for your attention. Let’s make some amazing cookies together at Kevin Cookie Company. Now that you know what DEEPBRAIN AI is capable of, let’s look at some of the other things that you can do with it. Back here on the homepage, let’s look at some of the other ways that you can use this AI avatar. Right here, you can send out personalized video messages using your avatar. You can even set up a series of videos that you publish to YouTube or TikTok. If we go over to the side, you could turn a URL or let’s say an Amazon product listing into a video. Here, this is a neat one. You could upload your PowerPoint presentation and then you could insert your AI avatar on top of that presentation. And you can even insert your AI avatar on top of a solid background. This way, you could import it into different video editing software and then you can use that in your projects. You have lots of different options to pull together your creative projects. And there you go. You now have a digital twin. Pulling together training, marketing, social media, or other types of videos have gotten so much easier. If you followed along with this video and made your own AI avatar, there’s a creator challenge going on right now where you can win $5,000. All you need to do is create a video using a custom avatar with AI Studios and share it to your social media. The video that goes the most viral wins the prize. To watch more videos like this one, please consider subscribing and I’ll see you in the next video. Or maybe you’ll see a Kevin avatar instead. Who knows?